Finding Scale Part 1 – WDW’s Magic Kingdom in Survival Minecraft
Google Maps is an incredibly powerful tool for many things. Finding the nearest Taco Bell (#NotSponsored), figuring out just how long it would take to drive to your streamer friends out of state, and of course… Checking out the backstage areas of Walt Disney World in Florida! And we used it a lot for the Kings Cross Station design build last month too.
Step one for prepping this Walt Disney World Magic Kingdom Mega Build was using Google Maps to simply move around the area and get a better idea of where everything was. It’s funny, there were certain parts of the Florida park that I always think of as, “to the right” that are actually on the left side is the park as a whole, but the right side of their respective “land.”
Importance of Scale

But the most important part of recreating something, whether it’s in Minecraft, a 3D printer, or just carving it out of wood, is scale. A house in Minecraft can look quite nice at 30 blocks wide, and in the real world, that could translate to 30 feet (9.1 meters) or it could translate to 50 feet (15.25 meters). A bigger scale in Minecraft means you can add more detail in, with stairs, slabs, fences, etc., But for something that’s almost 1 square mile (2.5 square kilometers), picking the proper scale from the beginning is super important.
I decided to start with two of the most iconic parts of the Magic Kingdom, Cinderella’s Castle and Main Street, USA. I want the castle to be super grandiose, huge and impressive… but if I make the castle too big, then suddenly Main Street is almost 30 blocks wide, and that just looks ridiculous. Nevermind the fact that the buildings will be 30-40 blocks tall with 8 block tall doorways or some nonsense!
But how do we figure out what a good scale is?
I can zoom way out and get an great overview. I can even use Google Maps to right-click and measure real-world distances so I know how much space something takes up. But what I can’t do is figure out how many blocks something will be. That’s where drawing tools like Photoshop and Affinity will come in! But first… the map!
Combining Hundreds of Screenshots into one Giant Map
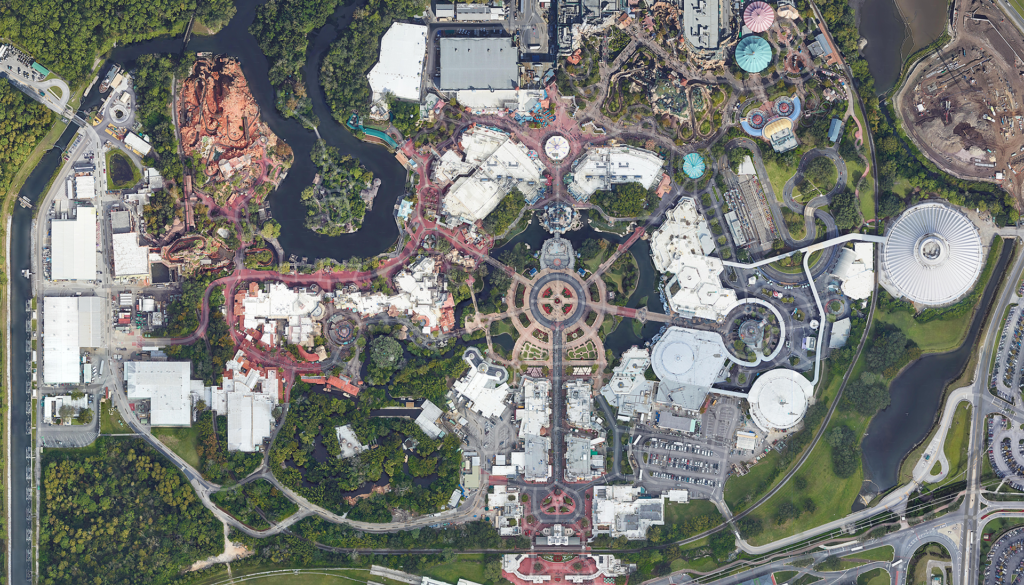
So I hop on Google Maps, zoom in to the absolute maximum zoom distance which is about 400 feet (122 meters) across depending on your screen resolution, and I started taking screenshots like this one here. Using the arrow keys on my keyboard, I would move to a new location and then run a recorded macro that would, “capture the screen, switch to the other view (map vs satellite), screenshot again in the exact same location, then save both identically-located screenshots.” That macro saved a bunch of time, and really helped with accuracy!
I worked in a grid, 18 screenshots tall by 9 wide for a total of 162 screenshots per map-type. Now all I had to do was put them together! (He says, like that was easy in any way.)
The first step was to crop each image slightly so we wouldn’t see the Google Maps icons and stuff. Photoshop can automate that in bulk, so that didn’t take long, but then I had to line them all up. First I tried using Photoshop’s “Photomerge” feature which will automatically line up images together to make panoramas or collages, but 162 nearly full-screen images is apparently too much for it (I even let it run overnight, but it just froze), and too often Photoshop would stretch or skew the images to get them to fit when I tried smaller batches, even though they were clearly taken in a grid pattern and should have lined up. So I ended up taking each image and lining them up by hand, pixel by pixel, for the satellite version. Not too bad on the parts with roads or buildings, but some of the mostly-tree sections were tough! Took about 3 or 4 hours to do the whole thing. Then I could take the regular map images and just line them up on top of their satellite counterparts. That part was actually super easy! Here are the finished versions:


Now we have two super high resolution images of the entire Magic Kingdom, but I still have to take those two images and actually figure out how this scales into blocks on Monkey Mines itself!
If you want to see the full size versions, they’re in my Google Drive here.
As always, you can follow along on my Twitch channel as this project progresses: twitch.tv/monkeydks
Up Next: Finding the Right Scale Part 2: Creating a Grid to get Block Scale


